Monday, May 25, 2009
Tweak IIS Performance
You are able to tweak the performance of your server on a network interface to suit the servers role. Most network engineers overlook this setting - I was one of them until a colleague pointed it out. If your server is running as an IIS server you should optimise the File and Print sharing for Microsoft Networks to maximize data throughput for network applications instead of file sharing on the network interface.

Sunday, May 24, 2009
Cybercafe Pro Client Maxing out 10 Session limit
I had an issue with the cybercafe pro 4.1.0.530 client using up all 10 sessions on the computer running the cybercafe pro server. Whenever a user logs into a workstation it would create a continuous SMB session to the cyber cafe pro server machine. Windows XP Professional only allows 10 at once, this meant if more then 10 users were logged in on an internet machine, no one could use SMB session information through the Server service such as printing. When you kill sessions under computer management they automatically reconnect. See how the idol time is 0 for all sessions of current logged in users?

After installing microsoft network monitor on the client machine, I logged on using a CCP user account, opened network monitor and identified it spamming the CCP server running on 192.168.20.33.

With a bit of research I identified that these microsoft remote procedure calls were related to printing.
opnum0x45 is RpcOpenPrinterEx()
optnum0x4 is RpcEnumJobs()
optnum0x1D is RpcClosePrinter()
In our case we had thousands of optnum0x4 protocol requests hammering the CCP server machine. As soon as 10 users are logged in, it hit the session limit and no one was able to print. I knew it was an issue with CCP because it only started when a user logged in. Also I knew it was printing as the protocol requests were printing related. The cause of the problem turned out to be print monitor module incorporated into CCP causing the ridiculous amount of network spam and using up all the sessions!!!

After un-ticking the box it resolved the problem.
Friday, May 22, 2009
How OAB Distribution Works
Exchange 2007 has a new way of distribution the OAB (Offline Address Book) compared to previous versions of exchange. It now distributes itself via an IIS website. Below I will be explaining this process along with the steps to set it up.
There are 4 components that make this work:
There are 4 components that make this work:
- OABGen
- Exchange File Distribution Service
- OAB Virtual Directory
- Autodiscover
OABGen
OABGen is the process that creates or generates the offline address book. OabGen.dll is actually invoked by the Exchange System Attendent. This process takes place on a single mailbox server in your exchange organisation. There can only ever be one mailbox server responsible for generating the OAB.
To view what mailbox server is generating the OAB, open exchange management console, expand organisational configuration, click mailbox then click the offline address book tab.

You can see in my organisation, KBOMBSERVER is generating the OAB. To change which mailbox server is responsible for generating the OAB, simply right click on the address book and click Move.

Here we can browse for new server responsible for generating the OAB.
The mailbox server running as your OABGen server will contain an SMB share called ExchangeOAB.

This is the folder where the client access servers acting as OAB distribution servers download the latest copy of the OAB. This share points to C:\Program Files\Microsoft\Exchange Server\ExchangeOAB by default. As a user you will not be able to access it as only exchange computer accounts have NTFS rights to it.

You can change the schedule when OABGen runs. By default its 5am every night. To change the schedule right click the address book, hit properties.

You can configure this to always run using powershell also however I do not recommend this as for large organisations OAB generation can result in extra load. I recommend leaving it on the default setting 5AM as nightly backups are ususally finished by this point and users dont ususally start work till around 6am at the earliest.
Lastly before I move on to the file distribution service, there is one more powershell command that comes in handy when dealing with OABGen. That command is:
Update-OfflineAddressBook
This is a manual method for regenerating your offline address book. It is great for testing and trouble shooting OABGen issues rather then having to wait for the schedule for it to automatically generate.
Note: This command updates the OfflineAddressBook from the Global Address List data that is generated from the Global Catalog. If Update-OfflineAddressBook does not update the data correctly, try updating the Global Address List using:
Update-GlobalAddressList -Identity "Global Address List"
Exchange File Distribution Service
The exchange file distribution service is a service that runs only on client access servers marked as distribution servers. To configure a client access server as a distribution server simply open exchange management console and navigate to Organisational Configuration --> Mailbox --> Offline Address Book, right click the offline address book and click Properties, then click the distribution tab.

Here you can simply add in client acces servers to the list. Idealy you want a client access server in each site configured as a distribution server. Because my environment is small, my mailbox server is also a client access server. However in large environments you would ususally have a client access server in every site ususally running the hub transport role on the same server.
One thing I would like to point out, the configuration for this is under Organisational Configuration --> Mailbox. The distribution points configuration on this distribution tab does not apply to Mailbox servers. Ideally it should be located under Organisational Configuration --> Client Access however I think Microsoft just wanted to keep all the OAB configuration together.
What the file distribution service does is copy the the OAB generated by the OABGen mailbox from \\oabgenerationserver\ExchangeOAB to the distribution server. By default it is copied to C:\Program Files\Microsoft\Exchange Server\ClientAccess\OAB. Also by default the file distribution service downloads the OAB from this share every 8 hours or 480 minutes. This can be changed, and different values can be set for each CAS OAB Distribution server. Say you wanted to set all CAS OAB Distribution servers to re-download the OAB from the OABGen server every 30 minutes. The command for this would be:
Get-OABVirtualDirectory Set-OabVirtualDirectory -PollInterval 30
This will configure every CAS OAB distribution server in your organisation to redownload the OAB every 30 minutes. However this is silly seeming OABGen by default only regenerates every 24 hours at 5am by default. In an environment where you have fast links between sitse, and say you have a mailbox server not holding mailboxes, only running as an OABGen server, you could configure this box to generate 24/7 so its data is always up to date and you could configure your client access servers to pull down every 30 minutes.
Also you can tell a client access server to manually download the latest OAB from the OABGen server for distribution. This can be done by running:
Update-FileDistributionService servername
Where servername is the name of the CAS distribution server you want to re-download the latest OAB.
OAB Virtual Directory
This is just the OAB directory in IIS. This is where the clients download the OAB from.

This directory points to C:\Program Files\Microsoft\Exchange Server\ClientAccess\OAB by default, the same place where the file distribution service places the files downloaded from the OABGen server. One thing that I have noticed though, is by default Authenticated Users do not have access to this folder, so how are they ment to download the OAB? Make sure you give authenticated users access to the OAB folder. This is only the case with server 2003... on server 2008 it adds IIS_USRS (a special IIS group) to the OAB folder to allow users to download. But on Server 2003 as of this writing Exchange 2007 SP1 with Update Rollout 7 only grants by default Administrators and SYSTEM full access by default. Ensure you add Authenticated Users with Read and List Content privilages or users will not be able to download the OAB and will revert to public folders if available.
Server 2008 permissions for OAB:

Autodiscover
Auto discover is responsible for letting Outlook 2007 clients know where to download the OAB from. If I hold down CTRL and right click on the Outlook icon in my system tray I am able to click Test E-Mail AutoConfiguration.

Here you can see the location autodiscover is giving me for my OAB download. Autodiscover uses the AD Sites and Services topology to give you the closest client access server acting as an OAB distribution server. If you are recieving the wrong server URL here, its because your AD topology is setup incorrectly.
It is also possible to change this URL for certain client access servers. This is great if you want to enable SSL for extra security, just ensure that the subject alternative name on the certificate matches the URL your providing otherwise your outlook clients will recieve certificate warnings.
Set-OABVirtualDirectory -Identity “CASSERVERNAME\OAB (Default Web Site)” -InternalURL https://mail.mydomain.local/OAB -RequireSSL $true
Lastly, if you are using Outlook Anywhere, port 443 will be forwarded to a CAS somewhere which could also be running OMA (outlook mobile access) or OWA (Outlook Web Access). This CAS if its a large organisation would probably consist of a NLB cluster. If this is the case and you are running Outlook Anywhere, on the same server that port 443 is forwarded to you must enable an ExternalURL for external autodiscovery to give out. This allows users externally to also download the OAB. Ensure that SSL is used to protect the confidential information contained in the OAB. To enable OAB for external distribution on the server 443 is forwarded to use this command:
Set-OABVirtualDirectory -Identity “CASWEBSERVER\OAB (Default Web Site)” -ExternalURL https://mail.mydomain.com/OAB -RequireSSL $true
I hope this post helps you understand and configure this OAB distribution process correctly, I decided to blog it because there is not many documents on the internet that explain it properally, and many fo them go into way to much detail and just confuses you... well it did me. If you have any questions email me, clint@kbomb.com.au
Resync an LCR or CCR Copy
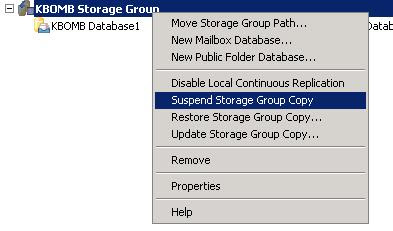
In Exchange 2007 you may find yourself in a situation where you will need to manually resync an LCR or CCR backup database - either the backup database is corrupt, gone out of date or perhaps you have performed an offline defrag on your production database. To do this first suspend your copy by right clicking on the storage group and clicking Suspend Storage Group Copy. This only takes your backup copy of the database offline, users will be able to continue working however this process will create high disk activity and users may experience their outlook clients hanging so if possible do this out of hours.
The powershell command to perform the resync is:
Update-StorageGroupCopy "KBOMB Storage Group" -DeleteExistingFiles
IN A CCR CLUSTER ONLY RUN THIS COMMAND ON THE PASSIVE NODE!
However Microsoft have made a GUI to do this as well... you can simply right click on the same storage group and click Update Storage Group Copy. However make sure you tick the box "Delete target transaction logs".
An article I found by Raphael can be very handy when a CCR cluster is down and everyone is in panic mode!
http://ibrid.wordpress.com/2009/07/06/exchange-2007-ccr-when-everything-goes-wrong-a-survival-guide/
Monday, May 18, 2009
When to use a front end server Exchange 2003
In Exchange 2003 a front end server is required whenever more then one mailbox server exists. Below is a scenario explaining why.
You have two sites, site1 and site2. Both sites have an exchange 2003 server holding user mailboxes. The network consists of a single active directory domain. Both servers are running outlook web access. There is one external dns name mail.mydomain.com that people use to access OWA. This DNS address can only point to one A record, which is going to be the public IP address of just one of the offices - say lets point it to site1. If a user has a mailbox in site2, accesses https://mail.mydomain.com/exchange and logs in with his username and password he will recieve the following error:
You have two sites, site1 and site2. Both sites have an exchange 2003 server holding user mailboxes. The network consists of a single active directory domain. Both servers are running outlook web access. There is one external dns name mail.mydomain.com that people use to access OWA. This DNS address can only point to one A record, which is going to be the public IP address of just one of the offices - say lets point it to site1. If a user has a mailbox in site2, accesses https://mail.mydomain.com/exchange and logs in with his username and password he will recieve the following error:

The error will vary depending on browser etc.. I'm accessing my internet through a squid proxy.
This error is because the server your accessing it through is not a front end servers. Front end servers determine which mailbox server to give the request to by determining the location of the users mailbox. The front end in effect acts as a proxy, and handles all SSL authenitcation requests from internet users taking load of the backend servers.
The only way to get the above scenario going without a front end is to have two different public dns records on the internet pointing to each office, and have site1 users access the OWA using the site1 public url, and site2 users access the OWA using the site2 public url.
Saturday, May 9, 2009
SCOM Service Accounts
A System Center Operations Manager 2007 installation will result in lots of service accounts for running various management packs and performing various tasks. However a base install will require you to create 5 main accounts. These accounts will be explained below:
Action
The action account is used by the management servers working with the clients. It gathers information and performs various tasks on agents.
Runas
Runas accounts are used to allow you to perform actions on clients from the management server with elevated privilages. Used for when your action account doesn't have privilages to perfrom a task so it uses the runas account to do this instead.
SDK and Config
Runs the SDK and Configuration SCOM services.
Data Warehouse Write
Used from a reporting server to write to the data warehouse SQL server.
Data Reader
For reading information from SQL.
Ways to Deploy Agents in SCOM
In System Center Operations Manager 2007 there are many different ways to install agents to client machines. These methods include:
- Discovery Wizard
- Manual Agent Installation of the SCOM CD
- msiexec.exe
- Group Policy
- Operations Manager Command Shell
- Scheduled Discoveries
- AD Integration Auto Assignment
- SCCM Deployment
Below we will be going through and looking at each method along with its pro's and con's.
Discovery Wizard
The discovery wizard is one of the most popular ways for Administrators to deploy agents to new managed assets in a SCOM 2007 infrastructure. The discovery wizard broadcasts subnets to find out which devices require agents installed, and gives you the option which devices you want to push the SCOM agent out to over RPC.
To kick this discovery wizard off you simply click administration, right click device management and click discovery wizard. There are two types of discoveries:
- Automatic Computer Discovery
- Advanced Discovery
Automatic computer discovery does every PC in the domain. Advanced discovery lets you select things like just servers. I always recommend advanced discovery.
For subnets that do not have their own management server, you can setup SCOM agents as proxies to do the broadcast for you. Basically you just select one PC that will always be powered on and mark it as a proxy inside operation manager console - very simple. Here is a little diagram I made to show you how this works.

When you use the discovery wizard agents are automatically approved, and do not enter pending management.
Manual Agent Installation of the SCOM CDYou can insert the SCOM installation disk into a windows client and install the Agent simply using the disk. If you do this, the agent will appear under Pending Management. You will then need to approve it in the operations manager console as a managed client.
msiexec.exe
You can use the msiexec.exe tool to install SCOM agents on workstations. Here is an example on how you would do this:
msiexec.exe /i \\path\Directory\MOMAgent.msi /qn /l*v \logs\MOMAgent_install.log USE_SETTINGS_FROM_AD=0 MANAGEMENT_GROUP=(Management Group) MANAGEMENT_SERVER_DNS=(Management Server FQDN) ACTIONS_USE_COMPUTER_ACCOUNT=0 ACTIONSUSER=(Username) ACTIONSDOMAIN=(Domain) ACTIONSPASSWORD=(Account password)
You can take this futher using admin tools such as psexec to run this command on multiple computers at a given time for mass deployments.
By default all these computers will appear under pending management. If you want them to automatically be approved there is an option under Operations Manager in global settings.

Group Policy
You can push the agent out to PC's using standard software deployment through group policy. When using group policy machines will not automatically be approved and you will have to add them manually unless you Auto-approve new manually installed agents.
Operations Manager Command Shell
You can install the SCOM agent on a single workstation using the Ops Mgr Shell by using a command similar to:
install-agent -ManagementServer servername -AgentManagedComputer agentcomputername
Or you could make a very simple powershell (.ps1) script.
$creds = Get-Credential
#Create an array $Servers for a list of servers
$servers = get-content c:\ServerList.txt
$DiscoCnfg = New-WindowsDiscoveryConfiguration -computername:$servers -performverification: $true -actionaccount:$creds -computertype: "server"
$ms = Get-rootManagementServer
#You have to Discover the computer first
$DiscoResults = Start-Discovery -managementserver $ms -windowsdiscoveryconfiguration:$DiscoCnfg
install-agent -ManagementServer $ms -AgentManagedComputer: $DiscoResults.custommonitoringobjects
This will mass deploy agents out to multiple machines.
Scheduled Discoveries
Scheduled discoveries was the prefered way of deploying agents in MOM 2005. However this feature was lost moving to SCOM 2007. In reality, it was more or less replaced by AD Integration. However an engineer created a powershell script that you can schedule to bring this feature back if you wish to do your deployments this way. Fore more information visit the following site:
AD Integration Auto Assignment
This is the most automated way to do the installation of agents on your network. If you wish to use AD Integration you need to prepare your domain using MOMADAdmin.exe which can be found on the SCOM CD in the support folder. This commandline tool creates a OperationsManager container on your domain partition.
Auto Assignment is done using LDAP queries. You can simply use something like AD Users and Computers which has a nice interface to create LDAP queries for you. I recommend creating a query that targets just operating systems with the word "server" in it - as I do not recommend monitoring clients as your monitoring servers will be flooded with logs.
I found this really good article that walks you through a step by step process in setting up Auto Assignment and SCOM AD Integration:
http://www.infrontconsulting.com/AD_OpsMgr2007.pdf
SCCM DeploymentYou can also deploy scom agents using SOE management software such as Microsoft System Center Configuration Manager server.
Friday, May 8, 2009
RMS and the SDK, Config and Health Service
In this post I'm going to run through the Microsoft System Center Operations Manager 2007 RMS (Root Management Server) and three critical services:
- SDK Service
- Configuration Service
- Health Service
All these services can be viewed in the services.msc console on a RMS server in a SCOM environment. It is Microsoft best practice that you do not run the SDK and Config services using the standard SYSTEM account and that you create a new account in AD Users and Computers to run both of these accounts as a service account. This account must be local admin on the RMS server.
SDK Service
Every SCOM management group contains one RMS. The SDK Service is one service account that can only be found on all Management Servers, however it is only enabled on the RMS. SDK stands for Software Development Kit. The SDK Service has a number of responsibilities, one of the main ones being an interface into the Operations Manager environment. All applications created to talk to Operations Manager must talk through the SDK Service.
Although all interface communication must come through the SDK Service, there is two connectors that applications must talk to first before being passed through the SDK Service. These connectors are known as the Operations Manager Class Libaries and the Operations Manager Connector Framework.
The Operations Manager Class Libaries is what all Microsoft interface tools use such as operations manager console, operations manager command shell and the operations manager web console.
The Operations Manager Connector Framework is for non-microsoft operations manager products. It allows developers to create custom applications for monitoring their SCOM environments using the extensive knowledge database Microsoft has made freely available on their MSDN website.
Here is a diagram I made that shows how this fits together nicely:

The SDK Service is also responsible for viewing the current state of a monitored object, importing management packs to the database, storing management packs in the database, and storing managed group configuration in the database.
Configuration Service
The configuration service is used to synchronise configuration from the root management server to all other management servers. It also lets all management servers know who the root management server is.
Health ServiceThe health service monitors the health of all the hosts on the network. This is done using management packs and other tools which SCOM provides. If the health service is stopped, performance logging and detection of failures will not occur.
Wednesday, May 6, 2009
Dell Studio 1537 Laptop Bluetooth Problems
I have a Dell Studio laptop 1537 Laptop... very good laptop I might add. However the bluetooth was not working. The software for Bluetooth was installed, Bluetooth was enabled in the BIOS however in windows Bluetooth would not appear in device manager. The laptop is running Vista Ultimate 32bit.
I also confirmed that BTTray.exe was running in the background however the bluetooth icon would never appear in the system tray.
I also had issues with the wireless button that controlls bluetooth and wifi. When you turn the wireless switch off bluetooth and wifi are ment to stay disabled. However if you close the laptop lid and put it to sleep then wake it up again, the wireless and bluetooth would re-enable even though the switch was still turned off. When I say bluetooth, I mean the bluetooth light on the laptop... the bluetooth in windows was still not functioning or getting detected in device manager.
The Dell Studio 1537 laptops come with a built in Dell Wireless 370 Bluetooth Mini-card.
I noticed that there was a bios revision. This notebook came with A07, and the update on Dell released febuary 2009 was A08. After installing this revision bluetooth showed up in device manager, the BTTray.exe icon appeared in my system tray. The Dell Bluetooth Travel mouse now works! Additionally this BIOS revision fixed the problems with the wireless button on the side of the laptop. Now when its off it stays off!
Please also see:
http://clintboessen.blogspot.com/2010/01/dell-studio-1537-laptop-wireless.html
Tuesday, May 5, 2009
GPMC Scripts - List All GPO's
I had the need to create a list of all GPO's on a domain. I found something new... when you install GPMC under C:\Program Files\GPMC\Scripts there is a whole bunch of scripts that you can run to perform different tasks that are not part of the GPMC console.
The script I used in this instance to create a list of all GPO's in a text file was ListAllGPOs.wsf.
cscript ListAllGPOs.wsf > c:\list.txt
If you have Windows Server 2008, these scripts are not included with group policy management console - However you can manually download them from here:
http://www.microsoft.com/downloads/details.aspx?FamilyId=38C1A89B-A6D2-4F2A-A944-9236999AEE65&displaylang=en
On Windows Server 2008 the scripts are installed to the following directory:
C:\Program Files\Microsoft Group Policy\GPMC Sample Scripts\
I found this blog by a guy named Garry who has gone through and created a brief description of what each of these Scripts in the C:\Program Files\GPMC\Scripts directory does. Well worth checking out, the link is:
http://wmug.co.uk/blogs/1972/archive/2006/05/01/39.aspx
Enable Network Level Authentication on Windows XP Service Pack 3
Windows 2008, Windows Vista and Windows 7 support a new feature called NLA (Network Level Authentication. This is a more secure method for remote desktop. To use network level authentication select the radio button on the Remote tab in System Properties.

Windows XP SP3 supports Network Level Authentication for connecting to devices running it. However by default on a XP SP3 machine if you try and connect to a device running NLA you will recieve this error:


Windows XP SP3 supports Network Level Authentication for connecting to devices running it. However by default on a XP SP3 machine if you try and connect to a device running NLA you will recieve this error:
To fix this we need to make a few registry changes on the Windows XP machine.
1. Click Start, click Run, type regedit, and then press ENTER.
2. In the navigation pane, locate and then click the following registry subkey: HKEY_LOCAL_MACHINE\SYSTEM\CurrentControlSet\Control\Lsa
3. In the details pane, right-click Security Packages, and then click Modify.
4. In the Value data box, type tspkg. Leave any data that is specific to other SSPs, and then click OK.
5. In the navigation pane, locate and then click the following registry subkey: HKEY_LOCAL_MACHINE\SYSTEM\CurrentControlSet\Control\SecurityProviders
6. In the details pane, right-click SecurityProviders, and then click Modify.
7. In the Value data box, type credssp.dll. Leave any data that is specific to other SSPs, and then click OK.
8. Exit Registry Editor.
9. Restart the computer.
Now when you attempt to connect to your remote computer running NLA it will successfully connect.
Friday, May 1, 2009
Vista Renames Redirected Folders to %Username%
Hi I have a series of folders redirected on my vista workstations such as My Documents, Desktops and Downloads all setup using group policy objects. They all go to a smb share on one of my file servers under:
\\servername\desktops$\%username%
\\servername\downloads$\%username%
\\servername\documents$\%username%
I noticed on more then one PC, Vista was renaming the redirected folder to %username%. For example Documents would become Clint, Downloads would be come Clint, Desktop would become Clint. This is very frustrating - I have seen it happen on more then one computer, and it appears to happen randomly. I have yet to put my finger on the trigger as to what causes this behaviour. All my Vista PC's are up to date in terms of patch level as of 1/05/2009 so there is currently no microsoft hotfix for this.
Here is an example of what I mean... in the following picture my Documents folder has mysteriously renamed to my active directory username.

After some investigation I have found out what in Vista is changing to make these folders rename. It turns out to be the desktop.ini file. Each one of these folders, Documents, Desktop, Downloads and any other folders you redirect all contain desktop.ini files. This file contains the information it needs for shell32.dll to name it. The name it gives the folder is determined on a predefined number string for example shell32.dll, -21770 for Documents. To fix the issue simply modify the desktop.ini hidden file and in the respective directory and replace it with the correct values. Below is a list of all the different profile folders and their default desktop.ini configuration. You can simply copy and paste from below:
Documents
[.ShellClassInfo]
LocalizedResourceName=@%SystemRoot%\system32\shell32.dll,-21770
IconResource=%SystemRoot%\system32\imageres.dll,-112
IconFile=%SystemRoot%\system32\shell32.dll
IconIndex=-235
Pictures
[.ShellClassInfo]
LocalizedResourceName=@%SystemRoot%\system32\shell32.dll,-21779
InfoTip=@%SystemRoot%\system32\shell32.dll,-12688
IconResource=%SystemRoot%\system32\imageres.dll,-113
IconFile=%SystemRoot%\system32\shell32.dll
IconIndex=-236
[LocalizedFileNames]
Sample Pictures.lnk=@%SystemRoot%\system32\shell32.dll,-21805
Music
[.ShellClassInfo]
LocalizedResourceName=@%SystemRoot%\system32\shell32.dll,-21790
InfoTip=@%SystemRoot%\system32\shell32.dll,-12689
IconResource=%SystemRoot%\system32\imageres.dll,-108
IconFile=%SystemRoot%\system32\shell32.dll
IconIndex=-237
[LocalizedFileNames]
Sample Music.lnk=@%SystemRoot%\system32\shell32.dll,-21806
Videos
[.ShellClassInfo]
LocalizedResourceName=@%SystemRoot%\system32\shell32.dll,-21791
InfoTip=@%SystemRoot%\system32\shell32.dll,-12690
IconResource=%SystemRoot%\system32\imageres.dll,-189
IconFile=%SystemRoot%\system32\shell32.dll
IconIndex=-238
[LocalizedFileNames]
Sample Videos.lnk=@%SystemRoot%\system32\shell32.dll,-21807
Searches
[.ShellClassInfo]
LocalizedResourceName=@%SystemRoot%\system32\shell32.dll,-9031
IconResource=%SystemRoot%\system32\imageres.dll,-18
[LocalizedFileNames]
Indexed Locations.search-ms=@shell32.dll,-32811
Everywhere.search-ms=@shell32.dll,-32814
Shared By Me.search-ms=@shell32.dll,-32802
Recent Music.search-ms=@shell32.dll,-32803
Recent Documents.search-ms=@shell32.dll,-32804
Recent Pictures and Videos.search-ms=@shell32.dll,-32806
Recent E-mail.search-ms=@shell32.dll,-32807
Recently Changed.search-ms=@shell32.dll,-32813
Downloads
[.ShellClassInfo]
LocalizedResourceName=@%SystemRoot%\system32\shell32.dll,-21798
IconResource=%SystemRoot%\system32\imageres.dll,-184
Favorites
[.ShellClassInfo]
LocalizedResourceName=@%SystemRoot%\system32\shell32.dll,-21796
IconResource=%SystemRoot%\system32\imageres.dll,-115
IconFile=%SystemRoot%\system32\shell32.dll
IconIndex=-173
Contacts
[.ShellClassInfo]
LocalizedResourceName=@%CommonProgramFiles%\system\wab32res.dll,-10100
InfoTip=@%CommonProgramFiles%\system\wab32res.dll,-10200
IconResource=%SystemRoot%\system32\imageres.dll,-181
If anyone finds out what triggers Vista to modify these desktop.ini files please let me know by emailing me at clint@kbomb.com.au. If I find out be confident that I will update this post straight away explaining it.
Outlook 2003 Unable to open the free/busy information
We had a user today that was unable view free/busy information for another user even though the other user had given her editor permissions on her calendar (more then enough to view free/busy).


It turns out that she was running only Outlook 2003 with no service pack. After installing service pack 3 this solved her problem.
Subscribe to:
Posts (Atom)